Nginx
Nginx
Nginx 是一个高性能的 HTTP/反向代理服务器和 IMAP/POP3/SMTP 代理服务器。
核心功能
- Web服务器
- 处理静态资源请求
- 支持 HTTP/2 和 Websocket
- 每秒可处理 10 万+ 并发请求
- 反向代理
- 隐藏真实服务信息
- 负载均衡
- 缓存常用响应内容
- 安全网关
- SSL/TLS 加密
- 防止DDos攻击
- 基于IP的访问控制
Nginx安装
源码编译安装
1.1 安装好依赖
gcc、gcc-c++、pcre-devel、zlib-devel、openssl、openssl-devel、wget
1 | yum -y install gcc pcre-devel zlib-devel openssl openssl-devel gcc-c++ wget |
1.2 解压nginx
1 | tar -xvf nginx-1.12.2.tar.gz |
进入nginx-1.12.2目录,进行检出
1 | ./configure --prefix=/root/nginx |
–prefix:指定nginx检出目录
执行make回车、然后执行make install,进行编译
1 | make install |
最后会发现/root/下面会多了一个nginx目录,这个目录就是nginx的执行目录
1.3 nginx命令
- ./nginx:启动nginx
- ./nginx -s stop:关闭nginx
- ./nginx -s reload:重启nginx
1 | ./nginx #启动nginx |
此时浏览器访问依旧不行。那是因为Linux的防火墙默认不让外界范围,必须要在防火墙中开放端口
1.4 防火墙开放80端口
1、查看所有开放的端口
1 | firewall-cmd --zone=public --list-ports |
2、开放80端口
1 | firewall-cmd --zone=public --add-port=80/tcp --permanent |
3、重新加载防火墙
1 | firewall-cmd --reload |
关闭防火墙:sudo systemctl stop firewalld 本次关闭防火墙(下次启动时防火墙又会开启)
禁用防火墙:sudo systemctl disable firewalld (每次启动时防火墙都关闭。需要重启生效)
查看防火墙状态:sudo systemctl status firewalld
1.5 设置nginx启动用户
nginx启动的用户默认为nobody,我们需要将其改为root(当前登录用户)
编辑/root/nginx/conf/nginx.conf
1 | user nobody |
1.6 测试访问
包管理器安装
以CentOS7为例
1 | yum install -y nginx |
包管理器安装特点:
- 自动解决依赖关系
- 安装路径遵循系统规范(如 /etc/nginx)
- 适合快速部署标准版本
- 版本可能较旧
配置文件详解
完整配置文件
1 | user root; |
nginx.conf配置文件主要分为三部分。
2.1 main块
1 | user root; # 工作进程worker所属用户 |
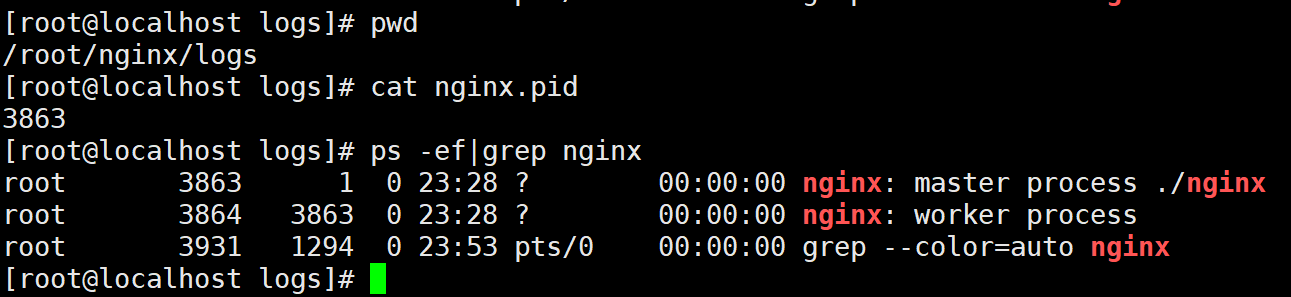
主要包括配置运行 Nginx 服务器的用户(组)、允许生成的 worker process 数,进程 PID 存放路径、日志存放路径和类型以及配置文件的引入等
user:设置worker进程运行的用户或用户组,默认是nobody用户(注意:nginx启动默认有两个进程,一个为master,另一个为worker)worker_processes:nginx要开启的工作进程数量,一般开启一个即可,如果服务器上配置有多个CPU可适当提高(一般保持和CPU核心数一致即可)worker_rlimit_nofile:nginx单个进程最大的打开文件数pid:指定master进程的存储文件位置- 查看master进程:
1
ps -ef|grep nginx
error_log:指定错误日志的存放位置- 格式如下:
1
2
3
4
5
6error_log path [level]
实例:
error_log logs/error.log
error_log logs/error.log debug
error_log logs/error.log notice
error_log logs/error.log info- 日志等级level的值有
debug,info,notice,warn,error,crit,alert,emerg,错误等级由低到高,debug等级最低(日志信息最多,但会带来较大的磁盘IO开销),emerg等级最高(日志信息最少) ,一般的日志是由warn | error | crit这三个场景产生。
2.2 events块
events 块涉及的指令主要影响 Nginx 服务器与用户的网络连接,常用的设置包括是否开启对多 work process下的网络连接进行序列化,是否允许同时接收多个网络连接,选取哪种事件驱动模型来处理连接请求,每个 word process 可以同时支持的最大连接数等。
1 | events { |
multi_accept:设置一个进程是否同时接受多个网络连接,默认为offworker_connections:每个进程允许的最大连接数- nginx服务器最大连接数=
worker_process * worker_connection open_file_cache max=3000 inactive=120s:open_file_cache:设置打开文件的缓存数量(worker_rlimit_nofile:设置单个进程打开文件的最大数量)- max:最大缓存文件数量
- inactive:文件在指定时间内未被请求,达到删除缓存条件
open_file_cache_valid 30s:30s检查一次文件缓存,如果发现有文件在120s内没有被使用,则清空该文件的缓存open_file_cache_min_uses 5:120s内如果有文件没有使用5次,那么则清空该文件的缓存
2.3 http块
http 模块主要定义代理、缓存和日志定义等功能。
2.3.1 http 全局配置
1 | http{ |
include:加载其他位置的nginx配置文件(互补配置)default_type:当服务器未识别请求资源的类型时,默认以该类型响应keepalive_timeout:HTTP 有一个 KeepAlive 模式,它告诉 web服务器在处理完一个请求后保持这个 TCP 连接的打开状态。若接收到来自客户端的其它请求,服务端会利用这个未被关闭的连接,而不需要再建立一个连接。KeepAlive 在一段时间内保持打开状态,它们会在这段时间内占用资源。占用过多就会影响性能。Nginx 使用 keepalive_timeout 来指定 KeepAlive 的超时时间(timeout)。指定每个 TCP 连接最多可以保持多长时间。Nginx 的默认值是 75 秒,有些浏览器最多只保持 60 秒,所以可以设定为 60 秒。若将它设置为 0,就禁止了 keepalive 连接。
2.3.2 server
1 | server { |
- listen:监听的端口
- server_name:访问的服务名(ip地址)
- error_page:错误页面
1 | error_page 404 405 406 /40x.html # 如果出现404 405 406错误则调到40x.html页面处理错误 |
tips:error_page处理的是nginx代理时出现的404问题,如nginx已经代理成功到对应的服务器上,因服务器上没有资源而404,则error_page不处理。
2.3.2.1 location
语法:
1 | location [=|~|~*|^~] /uri/ { … } |
示例:
1 | location / { |
location的uri匹配规则:
- / :无修饰符匹配,代表以 / 开头的所有uri都符合
1 | location /abc { |
- = :精确匹配,
1 | location = /abc { |
- ~ :匹配正则表达式(区分大小写)
1 | location ~ \.(jpg|png|bmp)$ { |
- ~* :匹配正则表达式(不区分大小写)
1 | location ~* \.(jpg|png|bmp)$ { |
- ^~ :类似于无修饰符匹配,但优先级比无修饰符高(本质上也是一种无修饰符匹配,不可以和无匹配修饰符同时使用)
1 | location = /1.png { # 1 精确匹配 |
测试:访问http://192.168.10.131/1.png,查看优先级。
查找顺序和优先级
1:带有“=“的精确匹配优先
2:^~ 匹配
3:正则表达式匹配
4:无修饰符匹配(精确匹配)
5:无修饰符匹配(模糊匹配)
2.3.3 root和alias的区别:
- root:访问的资源去哪个目录下寻找
- index:首页配置
- alias:别名配置
1 | location /abc/ { |
Tips:alias后面必须要用”/“结尾!否则会找不到文件,root可有可无
2.3.4 自定义日志格式
1 | http { |
常用的日志参数说明:
- $remote_addr:客户端的IP地址
- $remote_user:客户端用户名(基本身份验证时显示)
- $time_local:服务器时间([访问时间] 格式)
- $request:完整的原始请求(包含方法、URI和协议版本)
- $status:HTTP状态码
- $body_bytes_sent:发送给客户端的body字节数
- $http_referer:请求来源页面(从哪个链接跳转过来)
- $http_user_agent:客户端浏览器信息
- $http_x_forwarded_for:经过代理服务器时的客户端原始IP(需配置代理服务器转发)
- $upstream_response_time:后端服务器响应时间(反向代理时特别有用)
- $request_time:从客户端到Nginx的请求时间(单位:秒)
- $upstream_addr:上游服务器的IP地址
- $upstream_status:上游服务器的HTTP状态码
- $upstream_response_length:上游服务器返回的字节数
- $upstream_cache_status:上游服务器的缓存状态
- $upstream_connect_time:Nginx与上游服务器建立连接的时间(单位:秒)
- $upstream_header_time:Nginx从上游服务器接收响应头的时间(单位:秒)
- $upstream_response_time:Nginx从上游服务器接收完整响应的时间(单位:秒)
- $upstream_sent_time:Nginx将响应发送给客户端的时间(单位:秒)
- $upstream_total_time:Nginx与上游服务器的总时间(单位:秒)
- $upstream_request_time:Nginx与上游服务器的总时间(单位:秒)
- $upstream_bytes_sent:Nginx发送给上游服务器的字节数
- $upstream_bytes_received:Nginx从上游服务器接收的字节数
- $upstream_cache_status:上游服务器的缓存状态
配置完成后重新加载nginx配置:
1 | nginx -s reload |
Json格式日志示例:
1 | http { |
反向代理
3.1 准备工作
在线下载jdk并安装:
1 | yum -y install java-1.8.0-openjdk |
准备两个tomcat,一个为8080端口,另一个为8081端口
在防火墙中开放8080、8081端口
1 | firewall-cmd --zone=public --add-port=8080/tcp --permanent |
启动两台tomcat:
1 | ./catalina.sh run |
3.2 示例一
1 | server { |
3.3 示例二
1 | server { |
负载均衡
nginx负载均衡内置有4总算法,分别为轮询、权重(weight)、hash、fair等,其中轮询是nginx默认使用的算法
准备工作:
在两个tomcat下的webapps下创建aaa文件夹,并且创建index.html
4.1 轮询
默认选项,当weight不指定时,各服务器weight相同,每个请求按时间顺序逐一分配到不同的后端服务器
1 | upstream myserver{ |
查看是否有轮询效果。
4.2 权重(weight)
指定轮询几率,weight和访问比率成正比,用于后端服务器性能不均的情况。每台服务器的默认weight为1
1 | upstream myserver{ |
4.3 哈希(ip_hash)
每个请求按访问ip的hash结果分配,这样每个访客固定访问一个后端服务器,可以解决session不能跨服务器的问题。
1 | upstream myserver{ |
4.4 url_hash
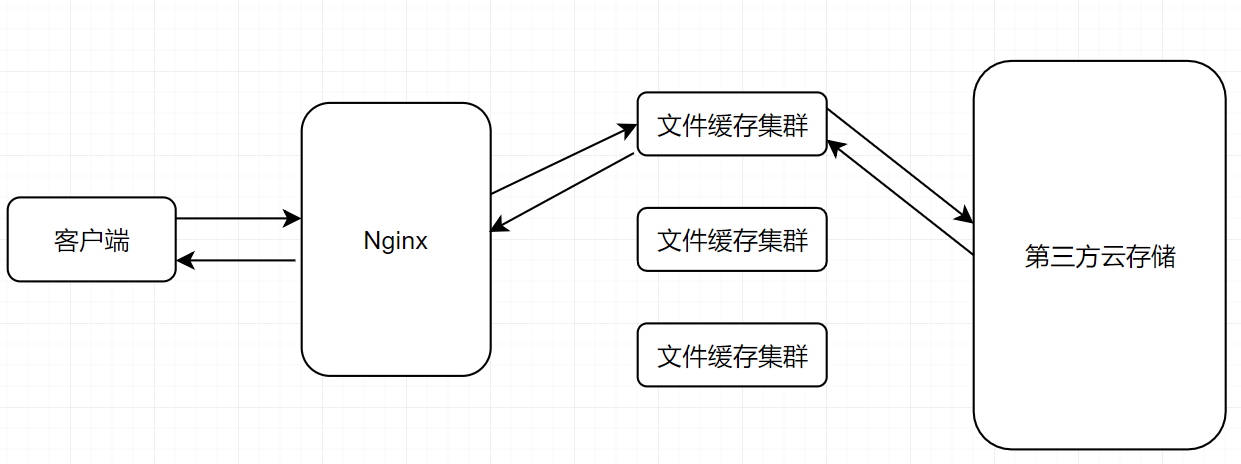
根据url的hash结果分配,同一个url访问的是同一台机器。一般用于下载服务器
1 | upstream myserver{ |
url_hash在早期的nginx版本中,nginx内部并没有集成url_hash功能,需要用户自己手动安装url_hash模块
当你服务端的一个特定url路径会被同一个用户连续访问时,如果负载均衡策略还是轮询的话,那该用户的多次访问会被打到各台服务器上,这显然并不高效(会建立多次http链接等问题)。甚至考虑一种极端情况,用户需要分片上传文件到服务器下,然后再由服务器将分片合并,这时如果用户的请求到达了不同的服务器,那么分片将存储于不同的服务器目录中,导致无法将分片合并。所以,此类场景可以考虑采用nginx提供的ip_hash策略。既能满足每个用户请求到同一台服务器,又能满足不同用户之间负载均衡。
4.5 fair
fair采用的不是内建负载均衡使用的轮换的均衡算法,而是可以根据页面大小、加载时间长短智能的进行负载均衡。
4.5.1 安装fair模块
fair模块属于第三方插件,功能没有集成在nginx中,因此要额外安装。
(1)安装unzip插件
1 | yum -y install unzip |
(2)解压nginx-upstream-fair-master.zip
1 | unzip nginx-upstream-fair-master.zip |
一、在安装nginx时就指定安装fair模块:
(1)进入nginx解压目录(nginx-1.12.2),检出文件
1 | ./configure --prefix=/root/nginx --add-module=/root/nginx-upstream-fair-master |
(2)编译和安装
1 | make install |
二、已经安装过nginx后安装fair模块:
(1)进入nginx解压目录(nginx-1.12.2)重新检出文件(地址和原来检出的时候一致)
1 | ./configure --prefix=/root/nginx --add-module=/root/nginx-upstream-fair-master |
(2)编译(只需要编译,如果安装会覆盖原来的)
1 | make |
(3)覆盖原来的nginx可执行命令
在当前目录中(nginx-1.12.2目录),进入objs目录,替换掉原来nginx的可执行文件
1 | [root@localhost nginx-1.12.2]# cd objs/ |
4.5.2 使用fair模块
1 | upstream myserver{ |
4.6 常用配置
1 | http{ |
- resolve:将server中配置的域名,使用指定域名解析器解析。
- weight:权重,默认为1
- backup:备份服务器,其他服务器都挂了之后才会生效
- down:设置当前服务器不可用(不会被分配请求)
- max_conns:设置服务器的最大连接数量,数量达到后,将不会有请求分配到该服务器,默认为0,代表不限制连接数
- max_fails:设置服务器运行请求连接失败的次数,超过该次数后,在fail_timeout时间内,不会有请求分配此服务器,默认为1
- fail_timeout:服务器到达max_fails次失败请求后,在fail_timeout时间内,nginx不会将新的请求分配到此服务器
- backup:备用服务器,当以上的所有服务器都不可用时,此服务器提供服务;
4.7 总结
4.7.1 轮询
- 概念
nginx默认的负载均衡机制,将请求轮询派发给每个服务器
4.7.2 权重
- 概念
给不同的web服务器分配不同的权重,默认每台服务器的权重为1,权重越高,访问几率越大
4.7.3 ip_hash
- 概念
为每一个ip地址都计算出一个hash值,nginx根据此hash值选择代理到哪台服务器,由于每一客户端的ip不易变动,因此可以解决集群环境下的session共享问题。
- 应用场景
- 当服务端的某个资源被同一客户端多次访问时,如果使用的负载均衡策略还是轮询的话,那么该用户会被轮询到各台服务器,造成资源浪费(会建立多次http连接,keepalive时间)
- 在作用于文件传输时,如果采用的是断点续传方式,那么则会导致文件最终上传失败。
4.7.4 url_hash
- 概念
为每一个访问的url都计算出一个hash值,nginx根据此hash值选择代理到哪台服务器
- 应用场景
- 缓存集群下载
4.7.5 fair
- 概念
nginx根据web服务器的响应时间来选择代理到哪台服务器(压力小的服务器优先选择)
Tips:fair功能属于第三方模块,需要手动安装
动静分离
Nginx 动静分离简单来说就是把动态跟静态请求分开,不能理解成只是单纯的把动态页面和静态页面物理分离。严格意义上说应该是动态请求跟静态请求分开,可以理解成使用 Nginx处理静态页面,Tomcat 处理动态页面。动静分离从目前实现角度来讲大致分为两种。
(1)纯粹把静态文件独立成单独的域名,放在独立的服务器上,也是目前主流推崇的方案;
(2)动态跟静态文件混合在一起发布,通过 nginx 来分开。
1 | location /dynamic/ { # 如果是dynamic下的请求,就代理到后台服务器 |
keepalived搭建高可用集群
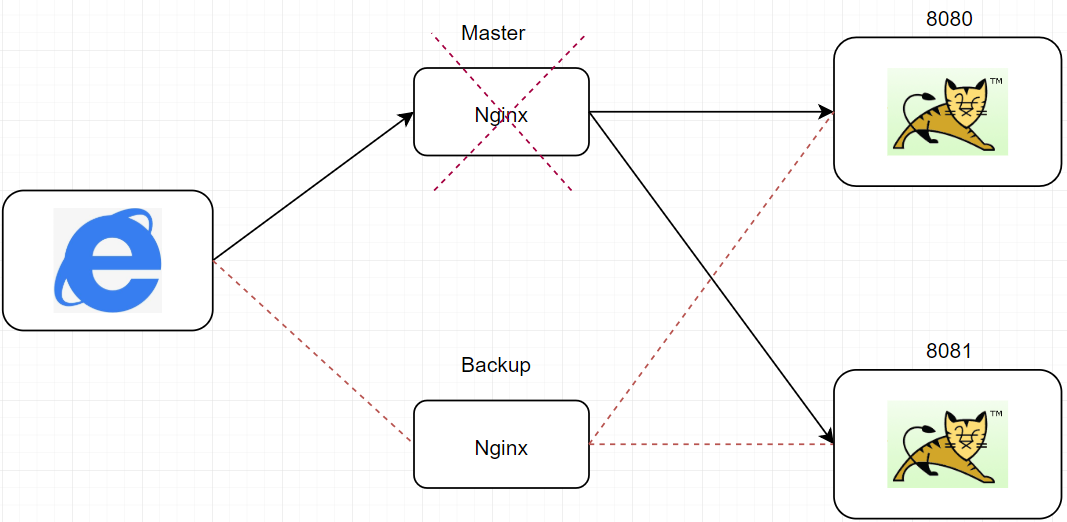
6.1 高可用集群
我们在后台搭建了Tomcat集群,使用Nginx做负载均衡处理,这就意味着Nginx是所有请求的”入口“,那么万一Nginx服务器出现故障,那么整个系统将会处于瘫痪过程,我们希望我们系统可以存在一台”备用“Nginx服务器,万一主工作服务器(主服务器)出现故障后,那么备份服务器可以顶替主服务器继续工作,保证我们的系统不会瘫痪,达到系统的高可用效果。
如图:
6.2 keepalived安装
(1)在线下载安装
1 | yum -y install keepalived |
(2)查看keepalived配置文件,/etc/keepalived/keepalived.conf
1 | vrrp_script check_ng { |
- 检测脚本
1 | A=`ps -C nginx --no-header |wc -l` |
- 安装killall命令
1 | yum -y install psmisc |
- 关闭selinux(关闭限制进程访问的资源)
1 | 临时关闭selinux |
- 授权
1 | chmod u+x /root/nginx_check.sh /root/keepalived_start.sh /root/keepalived_stop.sh /root/start.sh /root/stop.sh |
6.3 keepalived简介
keepalived是集群管理中保证集群高可用的一个服务软件,用来防止单点故障。
keepalived是以VRRP协议为实现基础的,VRRP全称Virtual Router Redundancy Protocol,即虚拟路由冗余协议。其作用是检测服务器的状态,如果有一台服务器宕机,或工作出现故障,Keepalived将检测到,并将有故障的服务器从系统中剔除,同时使用其他服务器代替该服务器的工作,当服务器工作正常后Keepalived自动将服务器加入到服务器群中,这些工作全部自动完成,不需要人工干涉,需要人工做的只是修复故障的服务器。
6.4 keepalived 工作原理
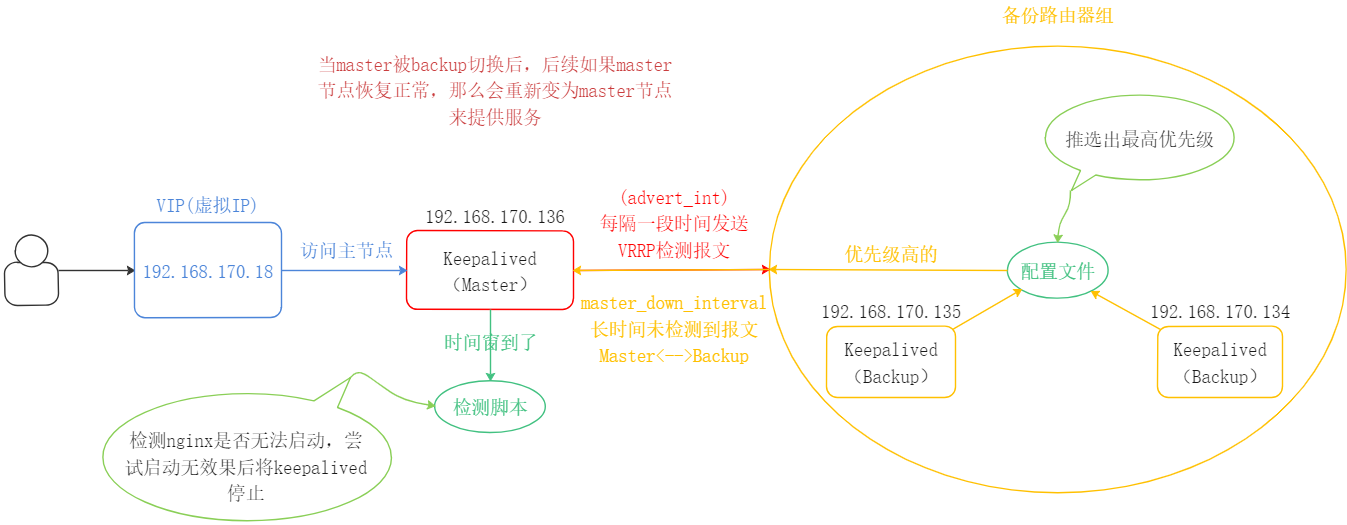
VRRP(Virtual Router Redundancy Protocol)虚拟路由冗余协议是一种容错的主备模式的协议,当网络设备发生故障时,可以不影响主机之间通信情况下进行设备切换,并且相对用户切换过程时透明的(用户无感知)。
路由器(安装了Keepalived的机器)开启VRRP功能后,会根据优先级确定自己在备份组中的角色。优先级高的路由器成为主用路由器,优先级低的成为备用路由器。主路由器拥有虚拟IP与虚拟MAC,实现各种网络功能,并发送VRRP通告报文,通知备用路由器组内的其他路由器自己工作正常;备用路由器则启动定时器等待通告报文。
6.4.1 抢占模式
当备份路由器组长时间(master_down_interval)未接收到master节点的VRRP报文后,备份路由器组则认为master节点已经无法正常提供服务(宕机),那么备份路由器组则会推选出一个优先级较高的backup节点(根据配置文件),作为主节点继续提供服务,当后续master节点(原来的)恢复正常后,备份路由器组接收到原来master节点的VRRP报文则认为master节点恢复正常,backup节点则回到备份路由器组,由master节点提供服务。
当备用路由器组收到VRRP通告报文后,会将自己的优先级与通告报文中的优先级进行比较。如果大于通告报文中的优先级,则成为主用路由器;否则将保持备用状态。
VRRP选举机制
- 虚拟IP拥有者,如果某台路由器的IP地址与虚拟路由器的VIP地址一致,那么这台就会被选为主用路由器。
- 优先级较高者,如果没有虚拟IP拥有者,优先级数值大的路由器会被选举出,优先级范围0~255。
- IP地址较大者,如果优先级一样高,IP地址数值大的路由器会被选举出。
在抢占模式中,优先级高的为master节点,state只是作为标注作用,并非真正意义上的master节点,具体的选举要看优先级
6.4.2 非抢占模式
在非抢占模式下,所有的节点都为backup,先启动的先提供服务(Master),后面的按照优先级顺序提供服务。主要注意的是,如果第一个提供服务的节点(Master)挂了,那么后续优先级高的将出来提供服务,当原来的”Master”节点又恢复正常之后,不会将服务切换为原来的”Master”节点提供,而是继续由现在的服务器节点提供服务。省去了当master节点恢复正常后,本来正常提供的服务节点backup需要将vip(虚拟ip)迁移到master节点的切换操作。
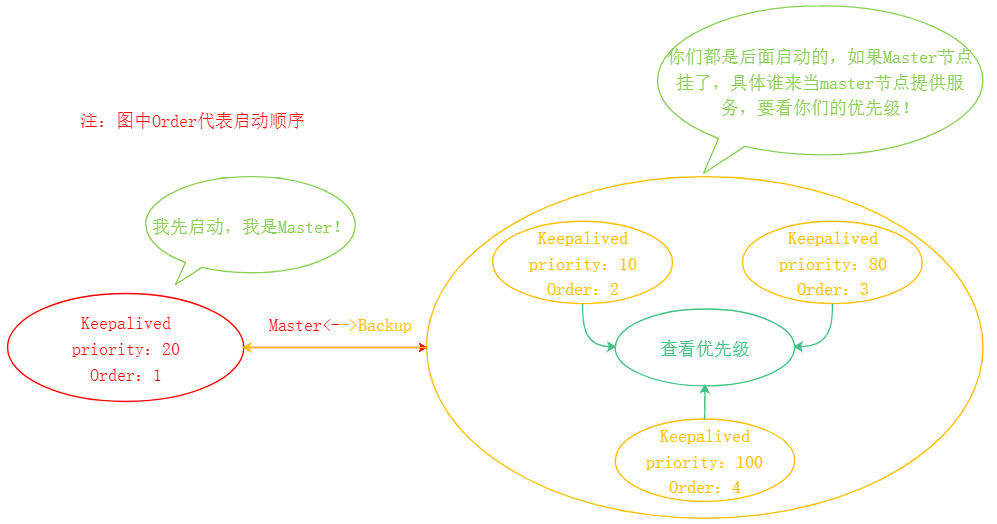
第一个启动的节点为master节点,后面启动的按照优先级分配。优先级高的作为下一个备选master节点。
1 | vrrp_script check_ng { |
Tips:在非抢占模式下,state标注的为Master节点;
Nginx工作原理
7.1 Nginx架构图:
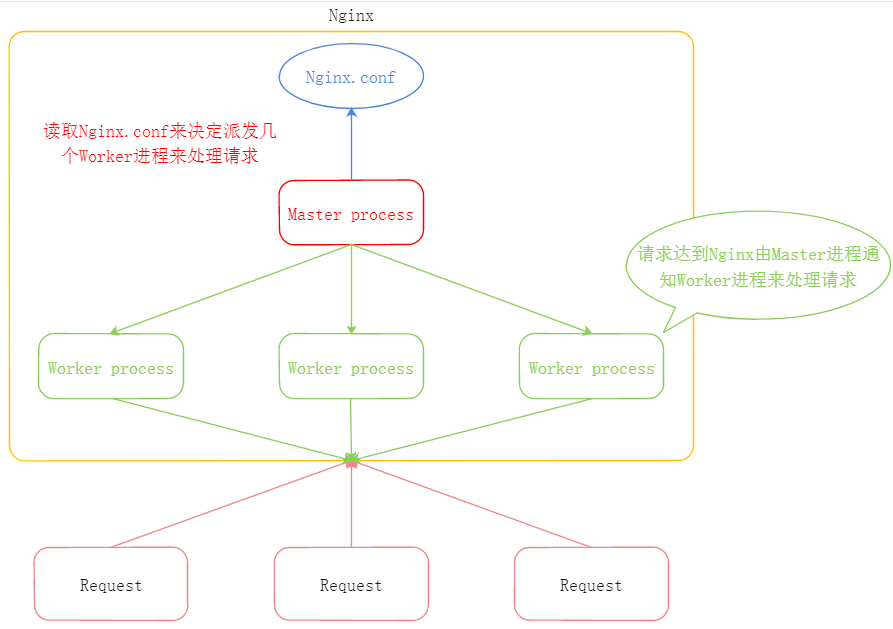
Master的任务:
读取并解析nginx.conf,管理worker进程,通知worker进程来处理请求。
Nginx是多进程单线程架构
Redis也是多进程单线程
Worker的任务:
Master进程发布消息之后,所有的Worker进程都来”抢夺”这个请求。
每一个Worker进程都可以极大的发挥单核CPU的极限性能
每一个Worker进程都是单线程的,这样避免了线程间的切换,Worker进程数一般和CPU的核数相同。
在nginx.conf中,可修改Worker的进程数量。
1 | worker_processes 1; # worker的进程数量 |
nginx的每个worker都会发挥出CPU单核的最大性能极限,因此一般将worker进程的数量设置为cpu的核心数量(线程数),设置少了会浪费CPU性能,设置多了会造成多个worker争抢同一个核心的上下文切换带来的损耗。
7.2 计算nginx并发数
每台nginx能建立的最大连接数为:worker process * worker_connections
但这仅仅是连接数,在http1.1中,浏览器的每次请求都会占用两个连接,因此nginx的并发数为:
worker process * worker_connections / 2
如果nginx作为反向代理服务器,那么nginx出了与浏览器进行连接外,还要与后台的web服务器进行连接(Tomcat)
因此nginx在作为反向代理时,并发量为:worker process * worker_connections / 4
